# Client Basics and Login System Part 1
We will start by implementing functionality to connect to a server and send a simple login request. Let's create a script that connects our client to a server.
- In the client project create a "ConnectionManager" script in the Scripts folder.
- In the main scene create an empty Gameobject and name it "ConnectionManager"
- Add a UnityClient component to that gameobject (you need to search for just "Client" when adding the component)
- Set the values of the UnityClient like this:

Important: Set Auto Connect to false we will connect in the ConnectionManager!
Now we will implement the ConnectionManager. First of all add the ConnectionManager as a component to the ConnectionManaegr gameobject. Then open the ConnectionManager in your favorite IDE.
We want the ConnectionManager to be globally accessible and present in all scenes. That's why we use the singleton pattern and provide a static field to access it. We add the following code:
using System;
using System.Net;
using DarkRift;
using DarkRift.Client.Unity;
using UnityEngine;

[RequireComponent(typeof(UnityClient))]
public class ConnectionManager : MonoBehaviour
{
    public static ConnectionManager Instance;

    void Awake()
    {
        if (Instance != null)
        {
            Destroy(gameObject);
            return;
        }

        Instance = this;
        DontDestroyOnLoad(this);
    }
}
This allows us to access ConnectionManager from any script by calling ConnectionManager.Instance, it will also keep the gameobject, where ConnectionManager is attached to, loaded when we swap it. We also make sure that we don't create 2 ConnectionManagers somehow.
WARNING
While this works just fine here, it is not an ideal implementation of the singleton pattern.
The next step is creating a connection to a server. There are two ways of connecting to a Darkrift server. ConnectInBackGround() and Connect().
- Connect() will connect to the server and freeze everything until it's connected or failed the connect. You can run code immediately after, to check if the connection worked (it runs synchronously).
- ConnectInBackGround() connects asynchronously to the server so your code will continue to run and players won't experience a screen freeze. It will invoke a void function of your choice with an exeception parameter as soon as it connected or when the connection failed.
We will use ConnectInBackGround because we don't want our clients to freeze for a few seconds after starting up. (In a real application you would also want to display an animated connection screen for the users)
We will add some variables and a way to ConnectInBackGround to our ConnectionManager. Add the following to the ConnectionManager script:
    [Header("Settings")]
    [SerializeField]
    private string ipAdress;
    [SerializeField]
    private int port;

    public UnityClient Client { get; private set; }
And also the following connection code:
    void Start()
    {
        Client.ConnectInBackground(IPAddress.Parse(ipAdress), port, IPVersion.IPv4, ConnectCallback);
    }

    private void ConnectCallback(Exception exception)
    {
        if (Client.Connected)
        {
            //here we will add login code later
        }
        else
        {
            Debug.LogError("Unable to connect to server.");
        }
    }
To access the Client component in Start we need to reference the component first in Awake so add the following line to the end of the Awake function:
Client = GetComponent<UnityClient>();
This code tries to connect to a server when we start unity and as soon as we are connected it will call the ConnectCallback function. The function checks if we are connected or if the connection failed. This is everything you need to connect to a Darkrift server.
Now let's create a simple login interface. We will only use a username and no password or account management in our login system to keep it simple.
- Create a "LoginManager" script in the Scripts folder
- Create a "LoginManager" GameObject in the Main scene.
- Add the LoginManager script as a component to the LoginManager Gameobject.
- Create a Canvas and add a Window(UI Image),scale it up to the screen size and then add a Button and a InputField to the window, your scene should look now like this:
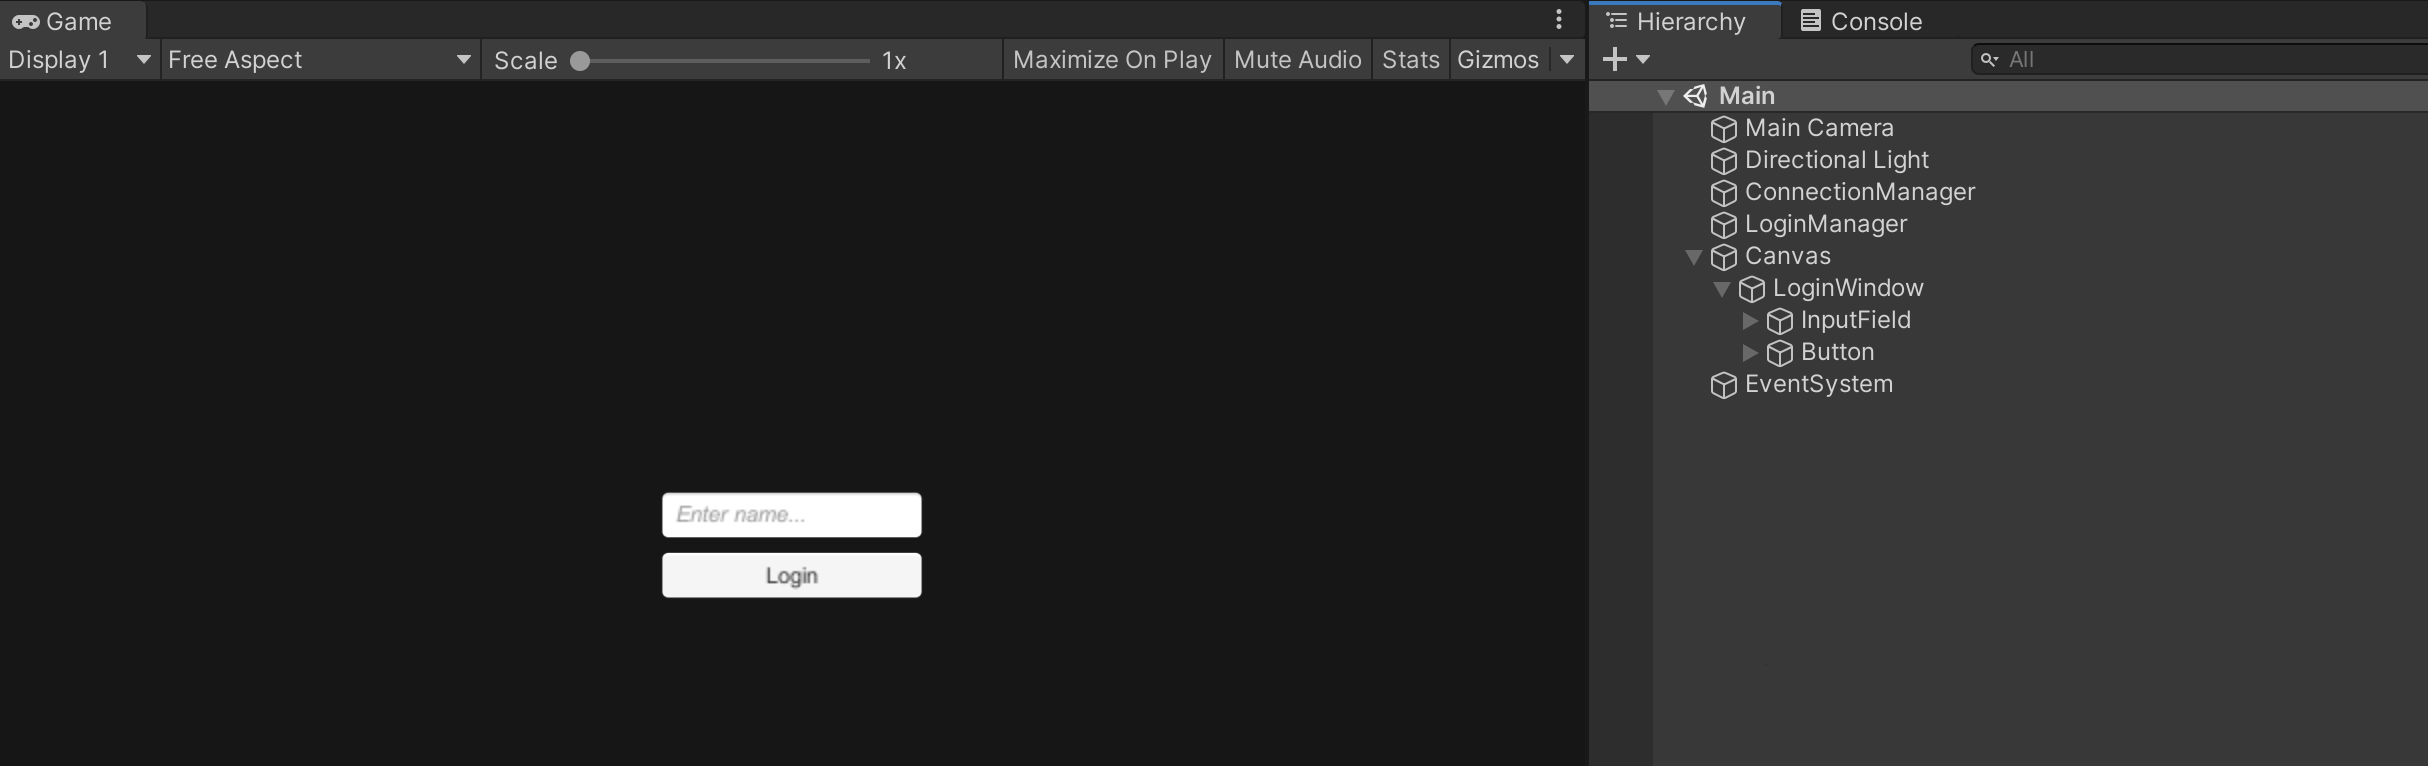
Now open the LoginManager and create some references to the login elements
using System;
using DarkRift;
using DarkRift.Client;
using UnityEngine;
using UnityEngine.SceneManagement;
using UnityEngine.UI;

public class LoginManager : MonoBehaviour
{
    [Header("References")]
    [SerializeField]
    private GameObject loginWindow;
    [SerializeField]
    private InputField nameInput;
    [SerializeField]
    private Button submitLoginButton;
}
It would be nice if the login window only appeared once we connected to the server so lets hide it:
    void Start()
    {
        loginWindow.SetActive(false);
    }
And create a function to activate it:
    public void StartLoginProcess()
    {
        loginWindow.SetActive(true);
    }
We want the StartLoginProcess to be called once we are connected. A good way to implement this while keeping the code extensible is using events. Go to the ConnectionManager script and add the following fields to it to define an event.
        public delegate void OnConnectedDelegate();
        public event OnConnectedDelegate OnConnected;
After defining the event let's invoke it in our connection callback if the connection succeeded.
    if (Client.Connected)
    {
        OnConnected?.Invoke();
    }
    else
    {
        Debug.LogError("Unable to connect to server.");
    }
Now go back to the LoginManager and subscribe to the event. It is considered good practice to always unsubscribe from an event as well so let's add both:
    void Start()
    {
        ConnectionManager.Instance.OnConnected += StartLoginProcess;
        loginWindow.SetActive(false);
    }

    void OnDestroy()
    {
        ConnectionManager.Instance.OnConnected -= StartLoginProcess;
    }
Now we can code our first message that we send to the server, but first we have to create a new script.
- Create a NetworkingData script in the Scripts/Shared folder.
- Open it and remove everything that unity created.
Darkrift uses tags to identify messages. A tag is a ushort value(0 to 65,535). We could try to remember all tags but people tend to be better at remembering words so we will use a c# feature to convert our tags into a human readable format.
Add the following to the NetworkingData script
public enum Tags
{
    LoginRequest = 0,
    LoginRequestAccepted = 1,
    LoginRequestDenied = 2,
}
This allows us to use Tags.LoginRequest as a tag which is easy to remember. We created 3 tags. LoginRequest is the tag for a message that a client sends to the server when he wants to login. LoginRequestAccepted and LoginRequestDenied are answers from the server.
But we have to send additional data to the server to login. In our case we just send a username but in most cases you would additionally also send a password.
TIP
Never send passwords without encryption, you have to use an encryption library to send messages with important information. Usually authentication is also not done by the game server itself but by a separate auth server or a third party provider.
When we send data to a server we have to serialize it (create a bunch of bytes out of our things that we want to send). Darkrift does that part for us. We can use a writer to serialize data like this. (Don't write this anywhere its just an example)
DarkriftWriter writer = DarkriftWriter.Create();
writer.write(5); // Writes an int value of 5 to the writer
writer.write((ushort)3) // writes a ushort value.
You can also write strings and floats and arrays to a writer. A writer is then used to create a message. A message wants a tag and a writer to send, in its constructor.
Message message = Message.Create(tag, writer);
You can the send a message by accessing a UnityClient and calling
UnityClient.SendMessage(message, sendmode);
There are 2 send modes in Darkrift SendMode.Reliable and SendMode.Unreliable. We will just use reliable for now and will come back to this point later.
On the server when we receive a message we can read values out of the message by creating a DarkriftReader:
DarkriftReader reader = Message.GetReader();
reader.readInt32(); // Reads an int
reader.readuint32(); // Reads an ushort
reader.ReadString(); // Reads a string
reader.ReadSingle(); // Reads a float
Readers, Writers and Messages should be disposed after using them so call Reader.Dispose() after using them. you can also use using blocks and achieve the same effect for example sending a message correctly looks like this:
using(DarkriftWriter writer = DarkriftWriter.Create()){
    writer.Write("this is a test message.");
    using(Message message = message.Create(tag, writer)){
         UnityClient.SendMessage(message, SendMode.Reliable);
    }
}
It is very important that you always read and write the same amount of data. But doing this the way above leaves room for a lot of mistakes and you will end up with a lot of read and write.
It would be nice to have a way to simplify that process right? Darkrift has a neat system to do that, IDarkriftSerializables. So instead of using writers and readers we will create a IDarkriftSerializable in our NetworkingData class:
public struct LoginRequestData : IDarkRiftSerializable
{
    public string Name;

    public LoginRequestData(string name)
    {
        Name = name;
    }

    public void Deserialize(DeserializeEvent e)
    {
        Name = e.Reader.ReadString();
    }

    public void Serialize(SerializeEvent e)
    {
        e.Writer.Write(Name);
    }
}
The LoginRequestData contains data in the form of a string Name and a function Deserialize and Serialize. These two functions are called when Darkrift sends a message. e.Writer.Write(Name) will "add" the name string to the message when we send it and e.Reader.ReadString(); will read it on the server side and recreate the LoginRequestData. As you can see reading and writing still works in a similar way. But debugging this will be much easier because you can check easily if the serialization of LoginData is correct or wrong. To now send a IDarkriftSerializable you can just put it into a message instead of a writer.
So lets add a function to the LoginManager to send a message:
    public void OnSubmitLogin()
    {
        if (!String.IsNullOrEmpty(nameInput.text))
        {
            loginWindow.SetActive(false);

            using (Message message = Message.Create((ushort)Tags.LoginRequest, new LoginRequestData(nameInput.text)))
            {
                ConnectionManager.Instance.Client.SendMessage(message, SendMode.Reliable);
            }
        }
    }
This function will deactivate the login window and then send a message to the server with the tag LoginRequest (= 0) and data in the form of a LoginRequestData which contains the name entered in the input field. The (ushort) in front of Tags.LoginRequest tells C# to convert LoginRequest back into an actual number.\
Finally lets subscribe our login button to that function. To do that add the following in the Start() function:
SubmitLoginButton.onClick.AddListener(OnSubmitLogin);
TIP
You can also subscribe a function to a button in the Unity UI of the button itself. I prefer to do it in code because it is less messy.
The scripts should now look like this:
- ConnectionManager (opens new window)
- LoginManager (opens new window)
- NetworkingData (opens new window)
Now lets jump to the to the server side...